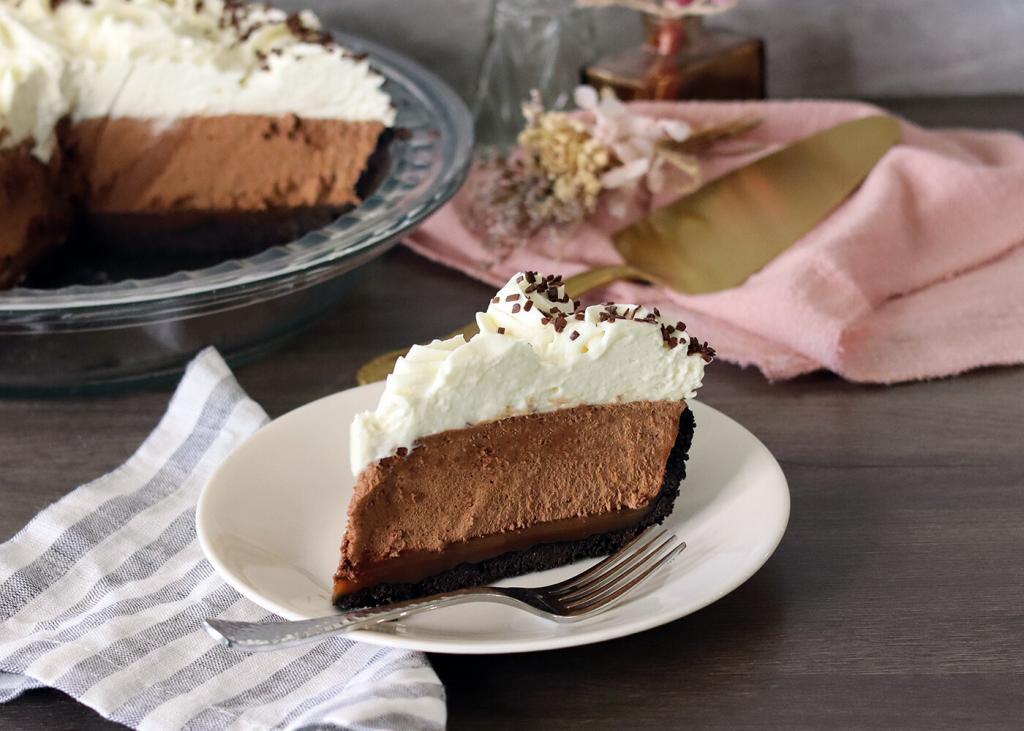
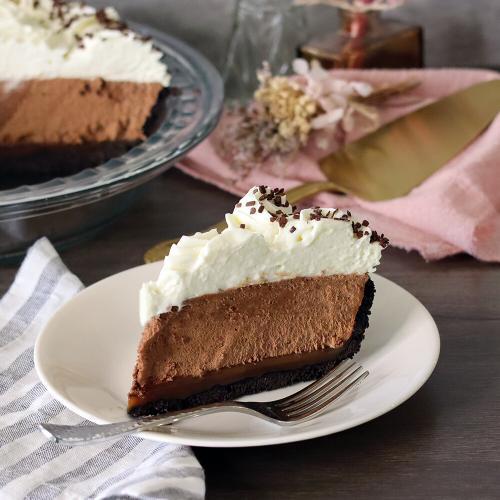
French Silk Pie
Despite the moniker of “French” Silk Pie, this incredibly indulgent, richly chocolate dessert is about as American as they come. The recipe was originally developed in the early 1950’s by a contestant, Betty Cooper, in the third annual Pillsbury Bake-Off Contest – it was, in fact, a $1,000 winning entry. As with many contest-winning recipes, Betty’s French Silk Pie exploded in popularity and has appeared in countless cookbooks, magazines, newspapers, blogs, social media accounts, restaurant menus and grocery stores across the United States over the decades.
The enduring popularity of the French Silk pie can probably be attributed to the combination of the classic chocolate flavor, silky airy texture and the accessibility of its pantry staple ingredients. While it can be somewhat time consuming to make, requiring extended time beating the filling mixture and long chilling times, the overall process is pretty straightforward. And, even though it is an easier pie to make, it both sounds and looks impressive.
I think it was about 6 years ago that I first started making French Silk Pie. It was an immediate hit with my family and has been a holiday staple in my home ever since. It is typically the first pie to be completely consumed at Thanksgiving. Of course, my version isn’t quite the same as the original…
- The original/traditional recipe uses a flaky pastry crust, but I’ve opted for a chocolate cookie crumb crust instead. Because why not have more chocolate?
- I chose to put a layer of salted caramel in the bottom of the crust, under the traditional filling (this is actually a fairly common twist on the classic pie). I like the texture and flavor contrast between the gooey caramel and the chocolate filling. I think this might be my younger son’s favorite feature of this pie.
- I increased the amount of filling a bit to fit a larger, deep dish pie plate (this shouldn’t surprise anyone as every pie I’ve posted has been deep dish 🙂)
- I added espresso powder to the filling to help enhance and intensify the chocolate flavor.
- I replaced the standard whipped cream topping with a white chocolate whipped cream instead, adding to the richness of the flavor profile and the silky mouthfeel. This has the added benefit of being more stable than a standard whipped cream.
One thing I did not change is the use of raw eggs in the filling. These are integral to the final texture and flavor of the pie. There are French Silk Pie recipes across the internet that cook the eggs with the sugar (either directly in a saucepan or over a double boiler) to 160°F, but every one of these recipes that I’ve reviewed relies on folding whipped cream into the filling in an attempt to provide the silky mousse-like texture that this pie is known for. Unfortunately, I think this misses the mark. The whipped cream dilutes the intensity of the chocolate flavor and the texture lacks the luxurious mouth feel you get with the traditional preparation. If raw eggs are a serious concern for you, I would opt for using pasteurized eggs in the traditional/original preparation method.
Equipment
Ingredients
Method
- Preheat the oven to 350°F.
- Place the cookies, sugar and salt in the bowl of a food processor. Pulse until the cookies are finely crushed and the sugar and salt are evenly distributed.20 Oreo cookies, 25 g (⅛ cup) sugar, 1/8 tsp (⅛ tsp) salt
- Add butter and the chocolate hazelnut spread and pulse until well combined and starting to clump together.37 g (2 tbsp) chocolate hazelnut spread, 35 g (2 ½ tbsp) butter
- Transfer the mixture into a deep dish 9 1/2 inch pie plate. Press evenly into the bottom and up the sides of the pie plate – it should come up to the upper edge/rim of the plate.
- Bake in the pre-heated oven for 10 minutes, remove from the oven and set aside to cool.
- In a medium saucepan, combine the sugar, water, corn syrup and salt. Place over medium heat and cook until the mixture is a deep amber color.180 g (1 cup) sugar, 86 g (⅓ cup) water, 20 g (1 tbsp) corn syrup, 3/4 tsp (¾ tsp) salt
- Quickly and carefully add the cream and vanilla bean paste (if you are using extract instead, do not add it until the very end or it will all cook off) and stir until fully incorporated.180 g (¾ cup) heavy cream, 10 g (2 tsp) vanilla bean paste
- Continue to cook the mixture until it reaches 234°F (if you are using vanilla extract, stir it in now), pour into the bottom of the prepared crust and refrigerate while preparing the filling.
- Place the dark chocolate in a small microwave safe bowl. Use the “melt chocolate” function (or 30 second bursts) to completely melt the chocolate. Set aside to cool.113 g (4 oz) dark (bittersweet) chocolate
- Using the whisk attachment of your mixer, beat the butter, sugar and salt together until the sugar dissolves and the mixture is very light and fluffy.224 g (1 cup) butter, 267 g (1 ⅓ cups) ultrafine bakers sugar, 1/4 tsp (¼ tsp) salt
- In a very small bowl, dissolve the espresso powder into vanilla extract. Add the espresso vanilla mixture to the butter/sugar mixture and blend until combined.10 ml (2 tsp) vanilla extract, 1/2 tsp (½ tsp) espresso powder
- Make sure the chocolate has cooled to room temperature, then fold the chocolate into the whipped butter and sugar mixture.113 g (4 oz) dark (bittersweet) chocolate
- Using the whisk attachment again, add the eggs one at a time beating for 4-5 minutes after each addition. Scrape down the bowl in between each egg addition. The final mixture should be light, fluffy and creamy.4 eggs
- Pour the filling into the prepared crust over the top of the layer of caramel, and smooth the top. Cover with plastic wrap and refrigerate at least 8 hours, or preferably overnight.
- Place 210ml (1/2 cup + 2 tbsp) whipping cream, the white chocolate and the salt in a microwave safe bowl. Use the "melt chocolate" function (or 30 second bursts) to heat the mixture until the white chocolate is completely melted forming a loose white chocolate ganache.420 ml (1 ¾ cups) whipping cream, 200 g (1 ½ cups) white chocolate, 1/8 tsp (⅛ tsp) salt
- Cover the white chocolate ganache and chill overnight – the mixture will be soft and stir-able straight from the refrigerator.
- Using an electric mixer, beat the white chocolate ganache until it is light and fluffy – avoid over beating or the mixture may curdle or break.
- Pour the remaining 210ml (1/2 cup + 2 tbsp) of whipping cream into the whipped ganache and resume whipping (start low and work up to medium speed) until medium-firm peaks form.420 ml (1 ¾ cups) whipping cream
- Spread or pipe the white chocolate whipped cream evenly over the surface of the filling. If you like, garnish with chocolate shavings, curls or sprinkles. Refrigerate until ready to serve. Store leftovers, covered, in the refrigerator.chocolate shavings
Notes
- If you are concerned about the raw eggs in this recipe, you can opt for pasteurized eggs instead.
- Even if you don’t typically like bittersweet chocolate, I would not recommend swapping it out here. Semisweet or milk chocolate would be far too sweet in the finished pie.
